Obtaining raster data with AppEEARS
AppEEARS is an application maintained by the NASA and the USGS that allows for extraction and exploration of analysis-ready geospatial data, from several remote sensing platforms. Raster data —a.k.a. satellite images— can be extracted using spatial (submitting Points or Areas of Interest) and temporal parameters. Most of the available platforms are managed by the USGS's EROS Center; particularly, they belong to the LP DAAC archive.
In adittion to its web interface, AppEEARS offers an API with endpoints for different operations; this means we could use R to communicate with the application. In this tutorial I will request, download and visualize SRTM elevation data. As a reference I followed an official tutorial which was kind of lengthy, so I will try to do it more concisely. Before starting, the user must register at the NASA's1 Earthdata Login.
Define an Area of Interest
AppEEARS accepts requests based on Points (POIs) or Areas (AOIs) of Interest. To show how to use the application, I decided to request elevation data corresponding to the area of Mount St. Helens in United States2. I will define my AOI as a polygon bounded by longitudes 122.4º W and 122º W, and latitudes 46º N and 46.4º N; I will save it as a GeoJSON file with geodetic coordinates (EPSG:4326).
aoi = c(rep(c(-122.4, -122), each = 2), rep(c(46, 46.4), 2)) |>
   { \(x) matrix(x, 4)[c(1, 2, 4, 3, 1), ] }() |> list()

library(sf)

st_sfc(st_polygon(aoi), crs = 4326) |>
   st_write("st_helens_aoi.json.txt", driver = "GeoJSON")
How to communicate with the API
To communicate with the API I will rely on the httr package; additionally,
I will use jsonlite to encode the requests, and dplyr to handle
the responses. Let's create a directory to place all the files I will download, and assign
the URL of the API to a string variable.
library(dplyr)
library(httr)
library(jsonlite)

dir.create("appeears_files")

app_url = "https://lpdaacsvc.cr.usgs.gov/appeears/api/"
When we say that the API has many endpoints, it means that, by extending its
URL, we can access to different functions. Each endpoint receives a specific type
of request (known as HTTP method); for our purposes, we only need to know two types of
requests: GET() to receive, and POST() to send information.
Discover products and layers
The first endpoint that I will communicate to is product:
it accepts a GET() request and returns a list of available
products 3.
get_products = GET(paste0(app_url, "product"))

status_code(get_products)
## [1] 200Every response from a HTTP method carries a code indicating the kind of outcome. The
convention is like this: 2XX codes are 👍 and 4XX codes are 👎. The 200 above signals
a successful operation. The remaining of the response is the info we requested; the
content() function transforms that info into list, so I
defined another one to then turn it into data.frame:
content2DF = function(content) {
   DF = matrix(unlist(content), length(content), byrow = TRUE)
   colnames(DF) = names(content[[1]])
   as.data.frame(DF)
}

products = content(get_products) |> content2DF() |>
   select(ProductAndVersion, Platform:TemporalGranularity)
In this context, by “platform” we generally mean an artifitial satellite, orbiting the Earth while it carries one or more sensors; a “product” is the whole set of data captured by one of those sensors and procesed in a specialized center. Currently, AppEEARS has 124 products from 14 platforms:
unique(products$Platform)## [1] "GPW" "Combined MODIS" "Terra MODIS"
## [4] "Aqua MODIS" "NASADEM" "SMAP"
## [7] "SRTM" "ASTER GDEM" "S-NPP NASA VIIRS"
## [10] "Landsat ARD" "DAYMET" "SSEBop ET"
## [13] "eMODIS Smoothed NDVI" "ECOSTRESS"select(filter(products, Platform == "SRTM"), -Platform)## ProductAndVersion Description RasterType Resolution TemporalGranularity
## 1 SRTMGL1_NC.003 Elevation (DEM) Tile 30m Static
## 2 SRTMGL1_NUMNC.003 Source (DEM) Tile 30m Static
## 3 SRTMGL3_NC.003 Elevation (DEM) Tile 90m Static
## 4 SRTMGL3_NUMNC.003 Source (DEM) Tile 90m StaticI've just filtered the products belonging to the SRTM platform.
It was a mission that put a radar in orbit, aboard the Space Shuttle Endeavour.
The goal was to create a near global Digital Elevation Model (DEM), applying the
radar interferometry
technique. As products of this platform there exist two DEMs4 with spatial resolution of 1 and 3 arcseconds (~30 y ~90 meters). I will request
an extract of the 90 meter data, "SRTMGL3_NC.003", keeping in mind that the
product's version (the last three numbers) must always be included.

Figure 1: Part of the SRTM mission hardware, photographed from Endeavour's flight deck; via Wikimedia Commons
Each product consists of one or more layers; usually each layer is a spectral
band of the pertaining sensor. Through the product endpoint it is also possible
to know the layers of certain product; I am going to request the layers of the
"SRTMGL3_NC.003" product, and select some important variables of the response:
get_product_layers = GET(paste0(app_url, "product/SRTMGL3_NC.003"))

product_layers = lapply(content(get_product_layers), \(x) x[-5] ) |> content2DF()

select(product_layers, Layer, Description:IsQA, Units:YSize)
## Layer Description FillValue IsQA Units ValidMax ValidMin XSize YSize
## 1 SRTMGL3_DEM Elevation -32768 FALSE Meters 32767 -32767 1201 1201The only layer, named "SRTMGL3_DEM", is precisely the DEM. Up to this
point we have identified the product and the layer that we are interested in.
Authenticate, a.k.a. Log in
While the product endpoint does not require that the user identifies itself,
to request raster data this will be a requisite. The method to authenticate is
using a second endpoint, login, which receives the user's name and
password (from Earthdata Login) and returns a token. In the next code I included
askpass() so the process is like logging in a website.
if (!file.exists("appeears_files/user_token.RDS")) {

   user_secret = paste0(
      askpass::askpass("Username:"), ":", askpass::askpass("Password:")
   ) |> base64_enc()

   post_login = POST(
      paste0(app_url, "login"),
      config = add_headers(
         "Authorization" = paste("Basic", user_secret),
         "Content-Type" = "application/x-www-form-urlencoded"
      ),
      body = "grant_type=client_credentials"
   )
   if (floor(status_code(post_login) / 100) != 2) stop(content(post_login)$message)

   saveRDS(user_token <- content(post_login)$token, "appeears_files/user_token.RDS")

} else user_token = readRDS("appeears_files/user_token.RDS")
The token is a character string that, from now on, will authorize me to use
the API. Since it is valid for 48 hours, I saved it as user_token.RDS;
after that, I would have to delete it and repeat this step.
Create and send a task
A task is a list of parameters defining what data we want from the API. To build
a task in R we create a list element with the following structure:
task = list(
   task_type = "area",
   task_name = "st_helens_dem",
   params = list(
      dates = data.frame(startDate = "09-04-2021", endDate = "09-05-2021"),
      layers = data.frame(product = "SRTMGL3_NC.003", layer = "SRTMGL3_DEM"),
      geo = fromJSON("st_helens_aoi.json.txt"),
      output = list(format = list(type = "geotiff"), projection = "geographic")
   )
)
The task_name parameter is arbitrary, whereas task_type can
only be area or point; the rest of parameters that I used are
mandatory, for a task of type area:
datesdefines the temporal range to extract data; in this case —because the SRTM mission started and ended in February 2000— we could define any interval, betweenstartDateandendDate, after"02-22-2000"; both values have to be in"MM-DD-YYYY"format.layersis comprised of two vectors,productandlayer, of the same length; here we put the previously identified product and layer.geodefines the spatial region, in EPSG:4326 and GeoJSON format, to extract data; here we read withfromJSON()the polygon saved at the begining of this post.outputdefines the type of raster to be returned;typemay begeotiffornetcdf4, andprojectionallows to do a reprojection5; in this case,geographicis the same as EPSG:4326.
Once the task is created, it can be sent along a POST() request to the
task endpoint. This request has to be authorized using the token already obtained,
and has to encoded as JSON (which can be achieved using the toJSON() function).
post_task = POST(
   paste0(app_url, "task"),
   config = add_headers(
      "Authorization" = paste("Bearer", user_token),
      "Content-Type" = "application/json"
   ),
   body = toJSON(task, auto_unbox = TRUE, digits = NA)
)
if (floor(status_code(post_task) / 100) != 2) stop(content(post_task)$message)
How is my task doing?
This step is optional. Depending on the size of the spatial region, the temporal range
and number of requested layers, the task's processing may last seconds or some minutes.
The following code asks the status of the process every 30 seconds, using the task's
id. For more complex tasks, the interval to ask should be increased by modifying
the Sys.sleep() call.
task_id = content(post_task)$task_id

task_status = "not done"

while (task_status != "done") {

   Sys.sleep(30)

   get_task_status = GET(
      paste0(app_url, "task/", task_id),
      config = add_headers("Authorization" = paste("Bearer", user_token))
   )
   task_status = content(get_task_status)$status

   message(as.character(Sys.time(), "[%T] "), task$task_name, " status: ", task_status)

   if (task_status == "error") stop(content(get_task_status)$error)
}
## [16:20:36] st_helens_dem status: processing## [16:21:07] st_helens_dem status: doneIt's ready! Download the content
When the tasks has status done, the requested data will be ready for download.
For each successful task, AppEEARS creates a bundle of files that includes,
besides the rasters, quality information and metadata. There's a
bundle endpoint which —adding the task's id— receives a GET()
request and returns the bundle's content.
get_bundle = GET(paste0(app_url, "bundle/", task_id))

bundle = content2DF(content(get_bundle)$files) |>
   mutate(file_name = sub("^.+/(.+\\.\\d{3})_(.+)_doy", "\\1-\\2/\\2-doy", file_name))

select(bundle, file_name, file_size)
## file_name file_size
## 1 SRTMGL3_NC.003-SRTMGL3_DEM/SRTMGL3_DEM-doy2000042_aid0001.tif 396174
## 2 SRTMGL3_NUMNC.003-SRTMGL3_NUM/SRTMGL3_NUM-doy2000042_aid0001.tif 49808
## 3 SRTMGL3-NUMNC-003-SRTMGL3-NUM-lookup.csv 1974
## 4 SRTMGL3-NUMNC-003-SRTMGL3-NUM-Statistics-QA.csv 536
## 5 SRTMGL3-NC-003-Statistics.csv 340
## 6 st-helens-dem-granule-list.txt 776
## 7 st-helens-dem-request.json 1059
## 8 st-helens-dem-SRTMGL3-NC-003-metadata.xml 22031
## 9 README.md 23442I modified the file_name variable so files are downloaded into directories,
according to product and layer. You may have notice that this endpoint does not
require authentication, meaning anyone who has the task's id can download its associated
bundle. That's exactly what the next code does, but I download only the first five files:
dir.create(bundle_path <- file.path("appeears_files", task$task_name))

for (file_id in bundle$file_id[1:5]) {

   file_name = bundle$file_name[bundle$file_id == file_id]

   message(as.character(Sys.time(), "[%T] download: "), file_name)

   if (!file.path(bundle_path, dirname(file_name)) |> dir.exists()) {
      file.path(bundle_path, dirname(file_name)) |> dir.create()
   }
   get_bundle_file = GET(
      paste0(app_url, "bundle/", task_id, "/", file_id),
      # progress(), # optional
      write_disk(file.path(bundle_path, file_name))
   )
}
## [16:21:07] download: SRTMGL3_NC.003-SRTMGL3_DEM/SRTMGL3_DEM-doy2000042_aid0001.tif## [16:21:11] download: SRTMGL3_NUMNC.003-SRTMGL3_NUM/SRTMGL3_NUM-doy2000042_aid0001.tif## [16:21:11] download: SRTMGL3-NUMNC-003-SRTMGL3-NUM-lookup.csv## [16:21:11] download: SRTMGL3-NUMNC-003-SRTMGL3-NUM-Statistics-QA.csv## [16:21:12] download: SRTMGL3-NC-003-Statistics.csvRead and visualize a raster
Among the downloads, the elevation raster is the only .tif in the
SRTMGL3_NC.003-SRTMGL3_DEM (the product and the layer I requested) directory.
The another .tif is from the “Source (DEM)” product and is automatically
delivered by the API; and the rest is statistical information. Now I will show how to read
and plot the elevation raster using the —aptly named— raster package:
library(raster)

file_name = "SRTMGL3_NC.003-SRTMGL3_DEM/SRTMGL3_DEM-doy2000042_aid0001.tif"

aoi_elevation = raster(file.path(bundle_path, file_name))

plot(aoi_elevation, asp = 1, col = grey.colors(64), maxpixels = ncell(aoi_elevation)/4)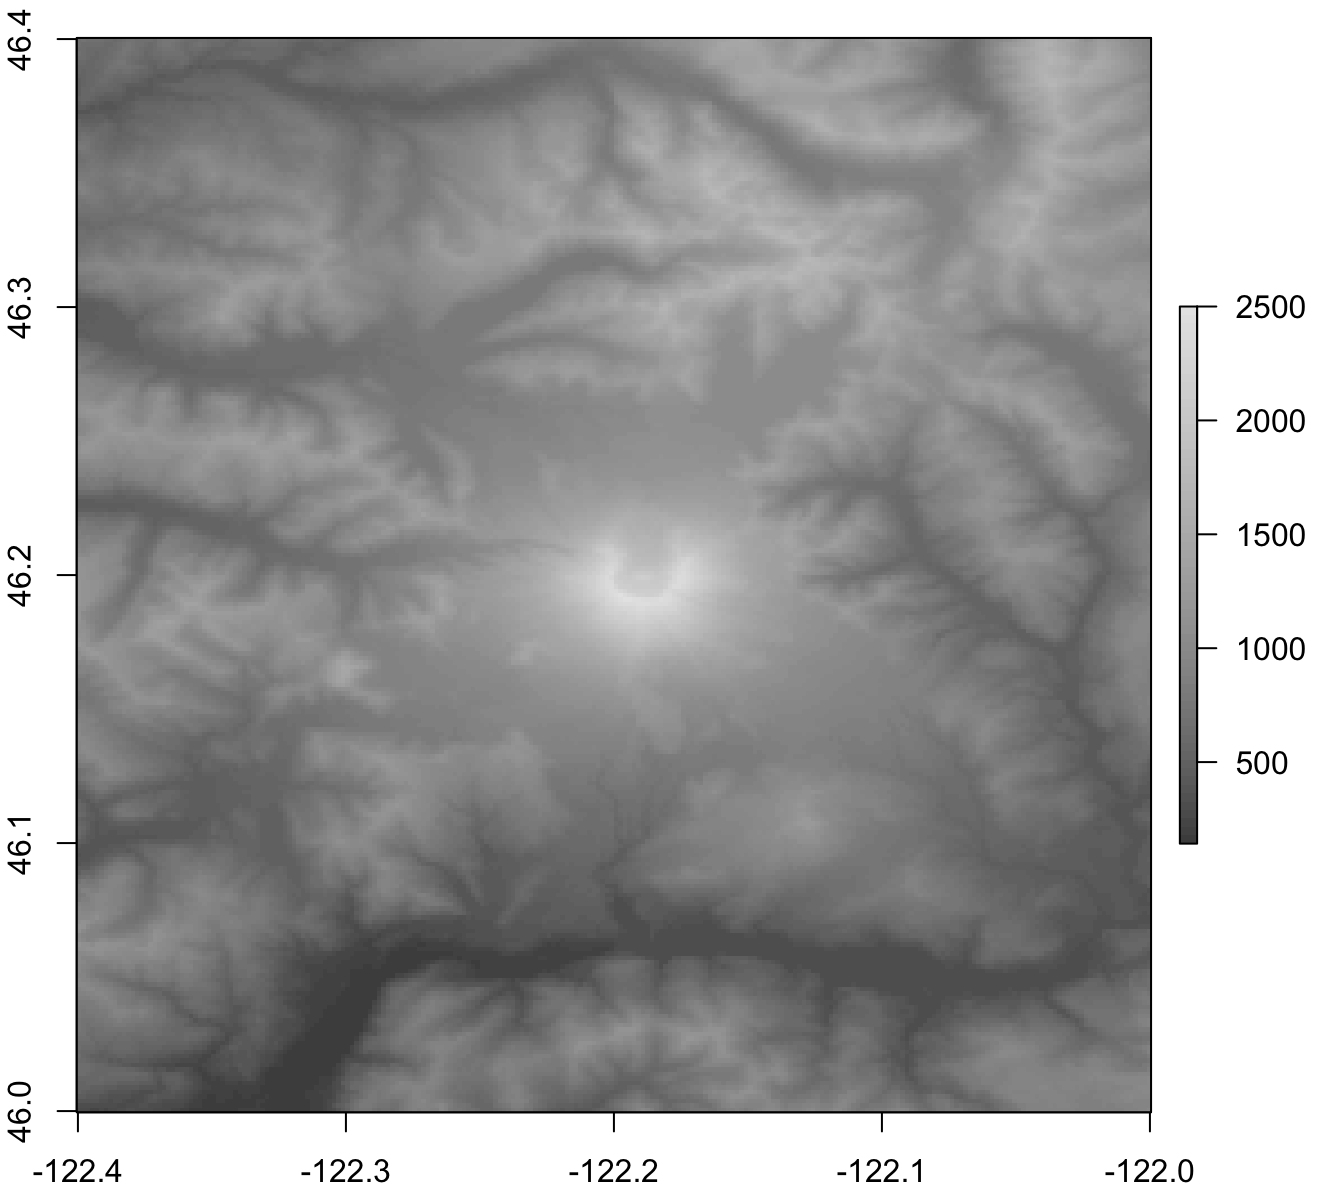
Figure 2: Mount St. Helens' SRTM elevation data
A common technique in cartography, to better visualize the terrain, is generating
what is known as a hillshade. The algorithm for computing the
hillshade()6
requires two input rasters: the slope and the aspect
(orientation); both can be generated with terrain():
aoi_terrain = terrain(aoi_elevation, c("slope", "aspect"))

aoi_hillshade = hillShade(aoi_terrain$slope, aoi_terrain$aspect)

plot(aoi_hillshade, asp = 1, col = grey.colors(16, 0, 1))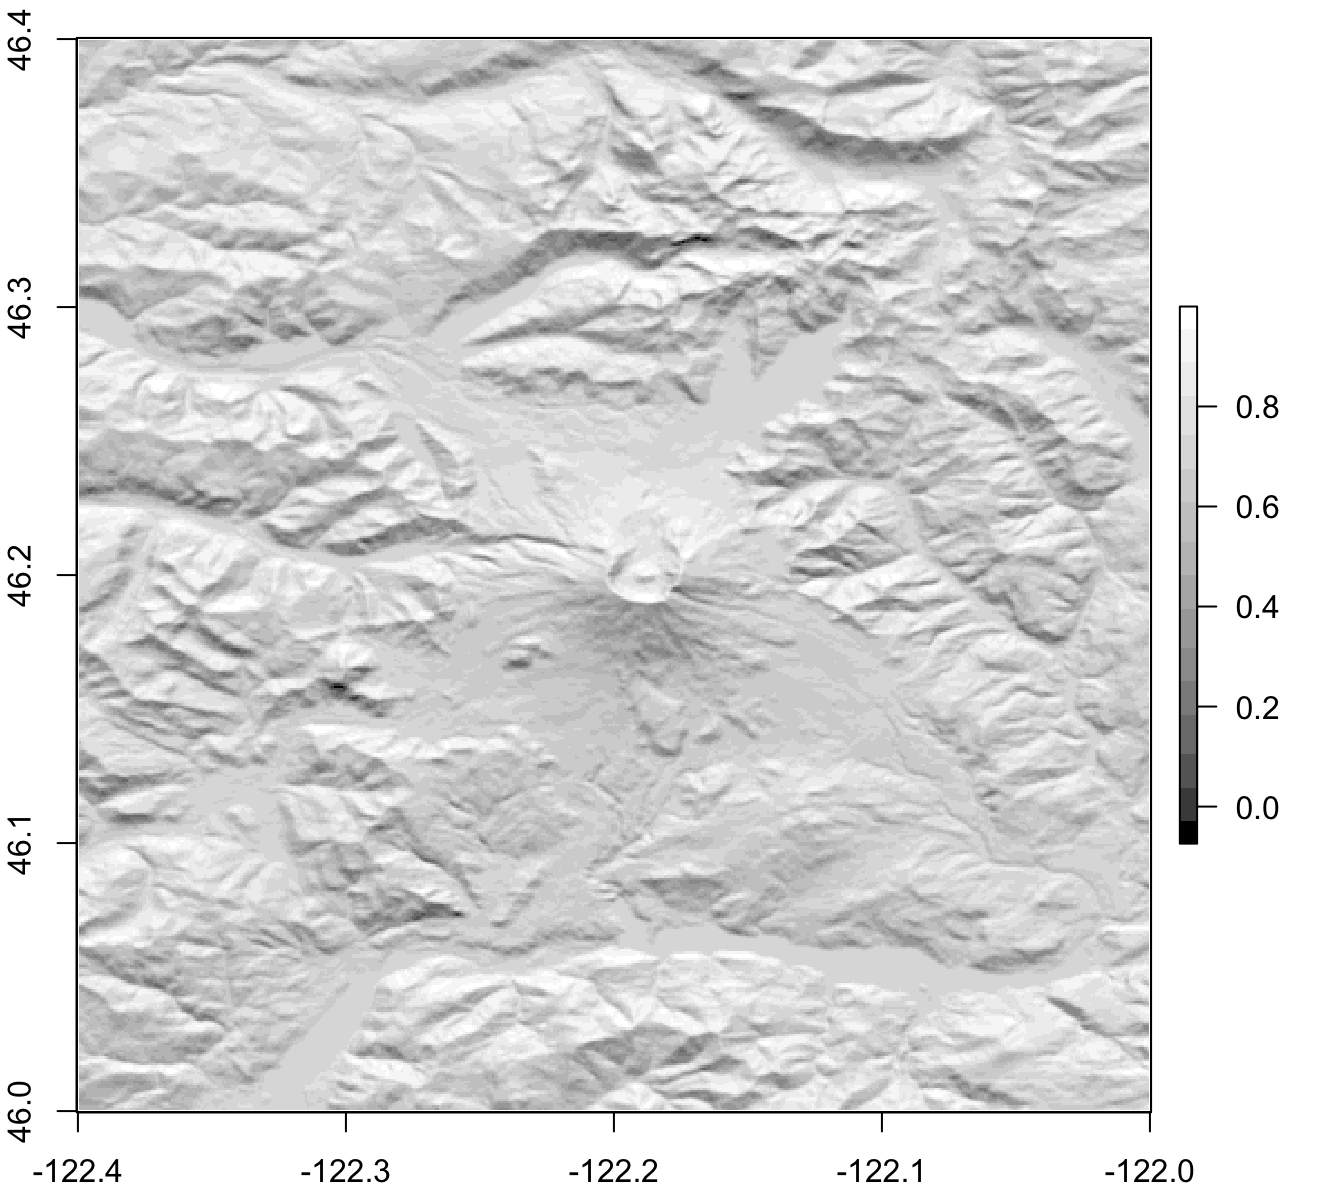
Figure 3: Hillshade generated with Mount St. Helens' SRTM elevation data
A hillshade is useful to add shadows —hence, a perception of the terrain— to another raster. In the next part of this post, I will be connecting to AppEEARS again, to show that technique.
Earthdata is a system that manages access to several geospatial data sources; besides AppEEARS, there is Earthdata Search, LP DAAC Data Pool, ASF Data Search, and others.↩︎
At first I wanted to request data from a region in my own country; there is a good reason behind my final decision.↩︎
Well you can also find the list of products in this link, but using the API is objectively more fun.↩︎
A “Source (DEM)” product records the provenance of each pixel in a associated “Elevation (DEM)” product; hence, I did not count them as products, but as quality files.↩︎
There are eleven projections available. To know which ones, send a
GET()request to the spatial/proj endpoing. ↩︎With default arguments,
hillshade()computes shadows as if the sun was at 45º elevation and 0º azimuth. Such position is impossible at Mount St. Helens, but this is something cartographers are willing to accept; to learn more about this subject, check The “Mountain Or Valley?” Illusion video by MinutePhysics.↩︎